Pages

Thursday, December 15, 2011

[Code Snippet] Rounded corners for UIView

We are very sorry about the lack of updates for the block, but now we are overloaded of projects and have no much time to write new posts :(

Here is a little and useful code snippet to round the corners of any UIView (UIWebView, UIImageView, etc...)

You have just to link your binaries with QuartzCore library and import it in the .h file.

#import <QuartzCore/QuartzCore.h>

And in .m file, you have to use this code snippet to round the corners. In the examble I've did it with a UIImageView

[imgView.layer setBorderColor:[UIColor blackColor].CGColor];
[imgView.layer setBorderWidth:1.0f];
                    
[imgView.layer setCornerRadius:10];
[imgView setClipsToBounds:YES];

With this four lines of code, you'll give your app a better look and feel.

Enjoy it!!

P.S. Don't forget to visit our web to see a complete catalogue of our apps.

Monday, December 5, 2011

New web site

We are proud to present you our new official web site: http://www.fiveflamesmobile.com in which you can see all of our developments for iOS, Android and Windows Phone.

This was the cause of the lack of updates of the blog, but don't worry because this blog will continue publishing articles for iOS and Windows Phone developers in blogspot.

We hope that you like our new web site and continue visiting this blog.

Regards!

Five Flames Mobile Team

Wednesday, November 16, 2011

[Code Snippet] Accesing to SSL server trust web services

This code snippet completes the two previous post that says how to connect to a REST service and consume it synchronous and asynchronously.

When we have to access a HTTPS web service first thing that we should think is how to store the trusted root certificate in our iPhone or iPad. Our device has installed some of the most used certificates (you can check the list here) and for this snippet we asume that the server uses Verisign, GoDaddy or any other common SSL certificate, so we have yet installed it.

To accomplish this task you should implement the next functions of NSURLConnection delegate:


- (BOOL)connectionShouldUseCredentialStorage:(NSURLConnection *)connection
{
    return TRUE;}
-(void)connection:(NSURLConnection *)connection didCancelAuthenticationChallenge:(NSURLAuthenticationChallenge *)challenge
{
    NSLog(@"Challenge cancelled");}
-(BOOL)connection:(NSURLConnection *)connection canAuthenticateAgainstProtectionSpace:(NSURLProtectionSpace *)protectionSpace
{
   // Server Trust authentication method
    return [protectionSpace.authenticationMethod isEqualToString:NSURLAuthenticationMethodServerTrust];}
- (void)connection:(NSURLConnection *)connection didReceiveAuthenticationChallenge:(NSURLAuthenticationChallenge *)challenge
{
  
    //Here we told the OS that validate the server certificate against our credential storage.
    [challenge.sender useCredential:[NSURLCredential credentialForTrust:challenge.protectionSpace.serverTrust] forAuthenticationChallenge:challenge];       
    NSLog(@"Reto superado");}

If we just want to bypass the authentication, instead of useCredential, we should use continueWithoutCredential method in didReceiveAuthenticationChallenge.

    //Bypass without credentials
    [challenge.sender continueWithoutCredentialForAuthenticationChallenge:challenge];

I hope this code snippet could be useful for you, enjoy it!

NOTE: This can be used only with NSURLConnection, just for asynchronous request.

Working in progress...

Hello everyone.

We're sorry for the lack of updates of the last weeks but J.A.Gallego was travelling round Spain with Windows Phone Roadshow and I was also very busy with a suite of nature oriented new iPhone (and maybe iPad optimized in the future) apps.

We're also creating a new web site, exclusively for our apps and games with the help of Virginia, our graphics designer, we'll keep this blog only for code snippets and geek stuff at blogspot for those who has it in their bookmarks and create a separately web for apps and projects to give them more visibility.

At last we are in the way to port Vinos de Cigales and Car Charge to Windows Phone and Android OS, so it's possibly that in the next days two new guys will be added to Five Flames Mobile staff...

These are the causes of the lack of updates, Twitter has been updated frequently but the blog wasn't so we apologize and will try to recover our weekly updates.

Thanks to all of our followers!

Wednesday, October 19, 2011

Windows Phone Roadshow 2011 (Valladolid, Spain)

Yesterday I left my MacBook Pro and the new XCode 4.2 to refresh my .Net for Windows Phone 7, which I'm alternating with Objective-C now, for going to the event organized by Microsoft Innovation Center Mobility Solutions (AKA CIM): Windows Phone Mango Roadshow 2011.

The even took place at Boecillo (Valladolid) and there was more than a hundred people to hear about this new mobile operating system by Eduardo Ortega, Jose Antonio Gallego (our Five Flames blog mate expert in WP7) from CIM and Isabel Gomez from Microsoft Ibérica.

This event is oriented to developers (obviously) and UI/UX designers too, excepting the Key Note and the Introduction to Windows Phone session that was oriented for all publics.

The keynote was presented by Isabel and Eduardo and talks about Windows Phone, its evolution to Mango, and the main improvements that this new version of the OS bring us.

After key note, Eduardo and Jose Antonio gives an introduction about programming for Windows Phone 7 both Silverlight Applications and XNA Games technologies with a little demo for each one. The use of Microsoft Blend studio for designing a rich UI/UX interface like a Flash app and how it's integrated with Visual Studio was awesome for most of the people who saw that create rich visual experiences was easier in Windows Phone 7 than other platforms.

Next session, also by Eduardo and Jose Antonio, talks about data access with SQL Server CE, accesing to web services and the new feature of WP7: Live Tiles. A "widget" like tile attached to an application in which you can show updated content.

In the break after this session the event organizers give us a free brunch for our hungry stomach and afterwards Eduardo Ortega talk us about Windows Phone advanced capabilities included in Mango: gyroscope, compass, accelerometer, camera and augmented reality with GART which could be used or implemented in a Windows Phone app/game with only a few lines of code.

After lunch Eduardo's session talks about multitasking in Windows Phone and the features asociated to this functionality: Tombstoning, dormant, background Agents and Fast Application Switch and how to use it from code.

Next to a little break that prepared us to final sessions Jose Antonio developed from start to end a complete app named "ZombSquare" in which was included every features seem in this event: Silverlight, XNA, 3D Models, Sensors, Data Access and Augmented Reality. The code of this app will be uploaded to codeplex after the Roadshow in order that atendees could experiment by themselves.

The final session, by Jose Antonio and Isabel, talks about uploading apps to Microsoft Marketplace, ROI, promoting apps and everthing useful to obtain cash for publishing our apps and games.

At last, there was a little contest in which Microsoft gives 5 Silverlight books by Josué Yeray and 5 Windows Phone mobile devices.

Globaly this event was very dinamic and the speakers answer people's questions at every moment. I highly recommended you this event for every developer/designer but expecially if you have previous knowledge in .Net technologies there will be very easy that you could begin programming for mobile phones.

The next places and dates that Windows Phone Roadshow 2001 will take place are:

I hope there will be new devices by Nokia and other manufactures for this Chrismats so this technology could grow up.

Monday, October 17, 2011

[How To] Get Device Unique Id in Windows Phone

To Get the device unique ID you need to first declare in the WMAppManifest.xml file this capability ID_CAP_IDENTITY_DEVICE.

You can use this ID to indentify one device (count unique users, send custom notifications, etc)

In code to get this Id you only need to do this:

public static byte[] GetDeviceUniqueID()
{
byte[] res = null;
object uniqueId;
if (DeviceExtendedProperties.TryGetValue("DeviceUniqueId", out uniqueId))
{
res = (byte[])uniqueId;
}
return res;
}

Enjoy it!

Thursday, October 13, 2011

[Code Snippet] Geolocating photos with reverse geocoding.

Sometimes you have an app which takes a photo, and you want to geolocate it obtaining current latitude, longitude and altitude from the GPS, but generally for the user this info is not useful, it has not a Reverse Geocoder in its brain so the user should prefer to see a name than three numbers.

In this code snippet we're going to se how to accomplish this.

First thing to do is to add the required frameworks to our app.

CoreLocation Framework
MapKit Framework

Next, in your .h file you have to import these frameworks and implement the protocols that we need.

#import <corelocation corelocation.h>
#import <mapkit mapkit.h>

@interface geolocatingPhotoViewController : UIViewController <UIImagePickerControllerDelegate,  CLLocationManagerDelegate, MKReverseGeocoderDelegate>

Let's take the photo with UIImagePickerController and when we've token it, we call CLLocationManager to get our position.

UIImagePickerController *imagePicker = [[UIImagePickerController alloc] init]; imagePicker.delegate = self;
imagePicker.sourceType = UIImagePickerControllerSourceTypeCamera;
[self presentModalViewController:imagePicker animated:YES];
[imagePicker release]; 

- (void)imagePickerController:(UIImagePickerController *)picker didFinishPickingImage:(UIImage *)image editingInfo:(NSDictionary *)editingInfo {
self.imageViewCaptura.image = image;
[picker dismissModalViewControllerAnimated:YES];
CLLocationManager * locationManager = [[CLLocationManager alloc] init]; locationManager.delegate = self;
locationManager.desiredAccuracy = kCLLocationAccuracyHundredMeters; [locationManager startUpdatingLocation];
}

Once we have our image stored in a UIImageView and we have to wait the CLLocationManager to get our position coordinates. When we have it, we stop the location and call the reverse geocoding to start getting the location name.

- (void)locationManager:(CLLocationManager *)manager didUpdateToLocation:(CLLocation *)newLocation fromLocation:(CLLocation *)oldLocation {
[locationManager stopUpdatingLocation];
[locationManager release];
capture.longitude = newLocation.coordinate.longitude;
capture.latitude = newLocation.coordinate.latitude;
capture.altitude = newLocation.altitude;

CLLocationCoordinate2D coordinate = CLLocationCoordinate2DMake(capture.latitude, capture.longitude);
MKReverseGeoCoder *reverserGeoCoder = [[MKReverseGeocoder alloc] initWithCoordinate:coordinate];
reverserGeoCoder.delegate = self; 
[reverserGeoCoder start];
}

At last, if MKReverseGeoCoder was able to get the coordinates info, we only has to get the data and show it.
- (void)reverseGeocoder:(MKReverseGeocoder *)geocoder didFindPlacemark:(MKPlacemark *)placemark {
if (placemark)
{
NSString *strLocation = [NSString stringWithFormat:@"%@, %@ (%@)", placemark.locality, placemark.administrativeArea, placemark.country]; self.textFieldLocation.text = strLocation;
}
NSLog(@"Location info: %@", strLocation );
}

We should control if GKReverseGeocoder wasn't able to retrieve our position information implementing didFailWithError function.

And that's all, now you know how to present location info to the user when it takes a photo.

Enjoy it!

Monday, October 10, 2011

[How to] Share links and status in Twitter, Facebook, linkedIN…

This post do not need any explanation :)

Microsoft.Phone.Tasks.ShareLinkTask shareLinks = new
Microsoft.Phone.Tasks.ShareLinkTask();
shareLinks.LinkUri = new Uri("http://www.fiveflamesmobile.com");
shareLinks.Message = "Try ShareLinkTask in Windows Phone";
shareLinks.Title = "Share Link Task Sample";
shareLinks.Show();


To update your status:
Microsoft.Phone.Task.ShareStatusTask status = Microsoft.Phone.Task.ShareStatusTask();
status.Status = Try ShareStatusTask in Windows Phone";
status.Show();

enjoy it!

Thursday, October 6, 2011

[Code Snippet] Send GET and POST data to web services asynchronously.

Last post talks about sending post and get values to a web service synchronously using NSURLConnection sendSynchronousRequest:(NSURLRequest)request method. Today we'll explain how to do the same request but asynchronously in background.

Firstly, we have to declare some instance variables:


    NSURLConnection *urlConnection;
    NSURL *loginURL;
    NSMutableData *responseData;


The initial code is like synchronous method, we have to prepare the NSURL object, and load the NSMutableURL object with the URL, the parameters and setting the correct headers value.

NSURL *url = [NSURL urlWithString:@"http://www.fiveflamesmobile.com/login.php?from=mobile"];
NSString *formValues = [NSString stringWithFormat:@"name=%@&device=%@", @"FiveFlames", @"iPhone"];
NSData *formData = [formValues dataUsingEncoding:NSUTF8StringEncoding];
[urlRequest setHttpBody:formData];

And now, instead of invoke sendSynchronousRequest method, we have just to initialize the NSURLConnection object with our request and set the delegate to the class that implements the delegate methods, in this case, our class.


urlConnection = [[NSURLConnection alloc] initWithRequest:request delegate:self];

And now we've just to implement the delegate methods. You haven't to put any protocol declaration in .h file.

Basic methdos to implement are:

Will send request is invoked just before to send the request, and we keep the "real" URL stored in our class variable.

- (NSURLRequest *)connection:(NSURLConnection *)connection
             willSendRequest:(NSURLRequest *)request redirectResponse:(NSURLResponse *)redirectResponse
{
    [urlConnection release];
    urlConnection =  [[request URL] retain];
    
    NSLog(@"URL Recibida: %@:", [[request URL] absoluteString]);
    
    return request;
}

If we have store some data into NSURLRequest HttpBody property, this method will be invoked just after have sent them.

- (void)connection:(NSURLConnection *)connection didSendBodyData:(NSInteger)bytesWritten totalBytesWritten:(NSInteger)totalBytesWritten totalBytesExpectedToWrite:(NSInteger)totalBytesExpectedToWrite
{
    NSLog(@"Petición enviada");
}


The method didFailWithError is invoked when the NSURLConnection fails so is time to check the error.

- (void)connection:(NSURLConnection *)connection didFailWithError:(NSError *)error
{
    NSLog(@"Error: %@", [error description]);    
}

The method didReceiveResponse is invoked when the server and the client establish the connection, so we have to initialize here the container in which the response will be saved.

- (void)connection:(NSURLConnection *)connection didReceiveResponse:(NSURLResponse *)response
{
    responseData = [[NSMutableData alloc] init];
    [responseData setLength:0];   
}

This method is invoked when data is received (obviously). If the amount of data is small, it will be invoked once, but if the amount of data is big, this method will be invoked repeatedly. We just to add the received data to the container.

- (void)connection:(NSURLConnection *)connection didReceiveData:(NSData *)data
{
    [responseData appendData:data];
    NSLog(@"Data sin decodificar: %@", data);
}


At last, connectionDidFinishLoading is invoked when the response is totally stored in our variable, so now it's time to log it, parse it or do whatever you want to do with it.

- (void)connectionDidFinishLoading:(NSURLConnection *)connection 
{
    //Log de la respuesta para depuración
    
    NSString *strResponse = [[NSString alloc] initWithBytes:[responseData bytes]
                                                     length:[responseData length
                                                   encoding:NSUTF8StringEncoding];
    NSLog(@"\n--------- Received Response ---------\n");
    NSLog(@"%@", strResponse);
    NSLog(@"\n--------- End of received response ---------\n");
    
    [strResponse release];
    
}

This is a very basic implementation of an asynchronous request.  We'll try to show you how to make SSL asynchronous connections, but we reserve it for another post.

Enjoy the code!

Friday, September 23, 2011

[Code Snippet] Send GET and POST data to web services.

It has been two weeks with a lot of work and a seriously lack of time to update the blog, but we are back again.

This week code snippet is about sending data to web services, XML and JSON are most used technologies used today but maybe some of your has to send data to an older php web page that receives data from a form by GET, POST or both of them. How could we accomplish that?

Let's see a code snippet to do it synchronously, later we'll publish a new entry with the asynchronous method.

First thig to do is to create the NSURL object which we are going to make the request to. If it has any GET parameters we should put them in the URL String.

NSURL *url = [NSURL urlWithString:@"http://www.fiveflamesmobile.com/login.php?from=mobile"];

After that we have to create a NSMutableURLRequest in order to put the post parameter.

NSMutableURLRequest *urlRequest = [NSMutableURLRequest requestWithURL:url];
[urlRequest setHttpMethod:@"POST"];

And now we only have to put in the HTTPBody the form variables as URL encoding like "key1=value1&key2=value2..." as a NSData object.

NSString *formValues = [NSString stringWithFormat:@"name=%@&device=%@", @"FiveFlames", @"iPhone"];
NSData *formData = [formValues dataUsingEncoding:NSUTF8StringEncoding];
[urlRequest setHttpBody:formData];

And now, we only just to make the request and save the response.

NSURLResponse *response;
NSError *error;

NSData *responseData = [NSURLConnection sendSynchronousRequest:urlRequest response:&response error:&error];

NSLog (@"Response: %@", responseData);

That's all, with this code snippet you could keep your older php or asp pages and reuse it to develop a server-client iOS app.

Enjoy it!

Thursday, September 8, 2011

[iOS2WP7] From iOS to Windows Phone. Introduction

From now we're going to alternate the blog's updates between Code Snippets and iOS to Windows Phone migration tips for whose that want to migrate this iOS applications and games to this new mobile OS.

iOS is a huge and very stable platform and iPhone is most sold device from all over the times, so there are thousands and thousand of applications and games in the AppStore. A lot of these games and applications are very useful or adictive (see Angry Birds for example) and Windows Phone users are waiting to have it in their phones so it's a good idea to migrate them, and now it could be a good moment to start.

Windows Phone is a very young OS for mobile devices, and being realistic there aren't so much available devices in the market so you could think "Why should I have to migrate my apps/games for that little potencial market?" Let's see a few good answers.

- Growing trend. Now there aren't a lot of devices running Windows Phone, but for Christmas campaign some manufacturers like Nokia (waiting for them...) HTC (Radar and Titan last ones) Samsung... are going to launch their last models including Windows Phone 7 Mango, so it seems that the potential number of users of your apps/games is going to growht.

- Positioning. Your app/games uploaded to Marketplace have less competence that another platforms like Android Market or AppStore so it's easier to have a better rating and visibility. If your app is the first to do something it will be a reference for Windows Phone users.

- Knowledgment: Maybe there are not much market to attack, but if you adquire the knowledment to migrate iOS apps/games to Windows Phone now, you will be one step beyond the competence if this platform begins to growth.

- Easy to develop: If you are a iOS developer, programming for windows phone is much easier than do it for iOS. I'm doing both things and believe me, it's easier.

- Facilities: Visual Studio for Mobile Development is free for developers, Microsoft developer license for one year has the same cost as iOS one...

- Lack of fragmentation. Like iOS, Windows Phone has fixed characteristics so you haven't to get crazy with differentes screen resolutions, different ROMs, different OS...

If after reading this article, you are convinced to migrate your apps, don't forgot this blog. We're going to publish coding tips, examples with both C# and Objective-C code for comparing, and a serie of articles to help you to accomplish this task.

For fist reading have a look to this guide published by Microsoft: Windows Phone 7 Guide for iPhone Application Developers

And the first link to have under Five Flames Mobile Blog ;) :Windows Phone Interoperability Bridges

Enjoy it!

Monday, September 5, 2011

[HOW TO] Intercept javascript events with Windows Phone WebBrower control

If you need intercept javascript events in Windows Phone web browser control, you must use the ScriptNotify event. This event is launched when the window.external.Notify() function is called from javascript code.

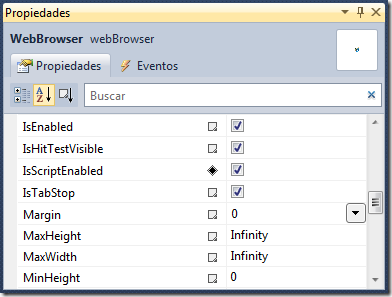
First you must enable IsScriptEnabled property.

IsScriptEnabled

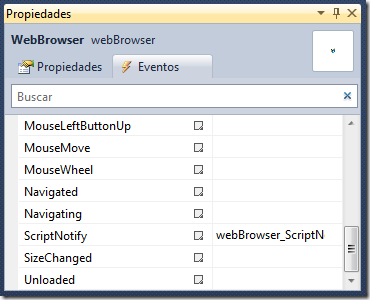
Second, you must handle the ScriptNotify event, you could make this from xaml code or from code behind, as you prefer.

webBrowser1.ScriptNotify+=new EventHandler<NotifyEventArgs>(webBrowser1_ScriptNotify);

EventScript

HTML Example:

<html>
<head> 
    <title>Demo Windows Phone</title>
    <script type="text/javascript">
function SendNotify() { window.external.Notify(‘demo’); }
</script>
</head>
<body>
    <div>
        <input type="button" value="Notify" onClick="SendNotify()"/>
    </div>
</body>
</html>

You can load this html code with NavigateToString function from WebBrowser control.

private void webBrowser_ScriptNotify(object sender, NotifyEventArgs e)
{
    if (e.Value == "demo")
    {
        MessageBox.Show(e.Value);
    }
}

Note: You can call javascritp functions from c# code, using InvokeScript method.

Monday, August 29, 2011

[How To] Disable Pivot swipe gesture in Windows Phone

If you need to disable Pivot gestures in WP7 you only need use the IsHitTestVisible  property. This property gets or sets a value that declares whether this element can possibly be returned as a hit test result from some portion of its rendered content.

If you set to true the contained area of this control can be used for hit-testing,
If set this property to false the control will not report any event when the user manipulate it.

In code, you only need mark the IsHitTestVisible property to false.

pivotControl1.IsHitTestVisible = false;

Remember that this action is not a recomended practice in Windows Phone.

Wednesday, August 24, 2011

[Code Snippet] Custom UINavigationBar back button

Back from my holidays, I come back with my weekly wednesday's code snippet.

Sometimes when we work with UINavigationcontroller we want to custom the back button for a more visual image, or just an arrow. Today let's see how to create a custom back button with our own image for the UINavigationBar.

First of all, you have to implement in viewDidLoad the next piece of code

    if ([self.navigationController.viewControllers count] > 1)
    {
        //Creating our custom back button
        UIButton *home = [UIButton buttonWithType:UIButtonTypeCustom];
        [home setTitle:@"Volver" forState:UIControlStateNormal];
       
        UIImage *homeImage = [UIImage imageNamed:@"backbutton.png"];
       
        [home setBackgroundImage:homeImage forState:UIControlStateNormal];
        home.frame = CGRectMake(0, 0, 80, 30);
       
        [home addTarget:self action:@selector(cancel:) forControlEvents:UIControlEventTouchUpInside];
       
        UIBarButtonItem *cancelButton = [[[UIBarButtonItem alloc]
                                          initWithCustomView:home] autorelease];
        self.navigationItem.leftBarButtonItem = cancelButton;
    }
After that, we just have to implement the selector to pop the view controller and back to the previous one:

-(IBAction)cancel:(id)sender{
    [self.navigationController popViewControllerAnimated:YES];
}
And that's all. Now you can improve your UI with a custom back button. Enjoy it

Tuesday, August 23, 2011

Windows Phone SDK 7.1 Release Candidate

The Windows Phone Software Development Kit (SDK) 7.1 provides you with all of the tools that you need to develop applications and games for both Windows Phone 7.0 and Windows Phone 7.5 devices. This download is the Release Candidate (RC) and provides a ‘Go Live’ license that enables you to develop and publish applications to the Windows Phone Marketplace.

The Windows Phone SDK includes the following

  • Windows Phone SDK 7.1 (RC)
  • Windows Phone Emulator (RC)
  • Windows Phone SDK 7.1 Assemblies (RC)
  • Silverlight 4 SDK and DRT
  • Windows Phone SDK 7.1 Extensions for XNA Game Studio 4.0
  • Microsoft Expression Blend SDK for Windows Phone 7
  • Microsoft Expression Blend SDK for Windows Phone OS 7.1
  • WCF Data Services Client for Window Phone
  • Microsoft Advertising SDK for Windows Phone


You can download this tools here: Windows Phone SDK 7.1 RC

Monday, August 22, 2011

[How To] Scroll a ListView from code

Scroll a ListView from code, sometimes could be a headache, but you only need do this in the next way.

public MainPage()
{
    InitializeComponent();
    miListBox.Loaded += new RoutedEventHandler(miListBox_Loaded);
}

void miListBox_Loaded(object sender, RoutedEventArgs e)
{
    miListBox.SelectedIndex = 14;

    miListBox.ScrollIntoView(miListBox.SelectedItem);
}

The key of this Tip is that you must call ScrollIntoView Metod after loading ListView control.


Regards!

Monday, August 15, 2011

[How to] Discover User Agent in Windows Phone

As you know, we can recover the UserAgent from web browser using javascript, specifically using the navigator object. With this object we can see the platform version, user agent and other properties of our browser, in this case we will use the navigator.userAgent property.

Windows Phone do not allow us exec javascript in native mode, but we can do this inside a WebBrowser control, for this, you can follow these setps:

1) Add a WebBrowser control to our PhoneApplication page.
2) Using the function NavigateToString to load the script,  you can see the script in the example showed below.
3) Finally we intercept the ScriptNotify event from WebBowser control and we will process and store the value in the IsolatedStorage for when we need.

Declare a WebBroser control.

private WebBrowser webBrowserControl;

In the constructor of our PhoneApplicationPage, instance and add the control.

        public ManiPage()
        { 
            (…) 
            control.Loaded += new RoutedEventHandler(webBrowserControl_Loaded);

            webBrowserControl = new WebBrowser();
            webBrowserControl.IsScriptEnabled = true;
            webBrowserControl.Visibility = System.Windows.Visibility.Collapsed;
            webBrowserControl.ScriptNotify += new EventHandler<NotifyEventArgs>(webBrowserControl_ScriptNotify);
            contentPanel.Children.Add(webBrowserControl);
        }

When the WebBrowser control is loaded completely, we will load the scritp using NavigateToString function.

        void webBrowserControl_Loaded(object sender, RoutedEventArgs e)
        {
            string html = @"<!DOCTYPE HTML PUBLIC ""-//W3C//DTD HTML 4.01 Transitional//EN"">
                <html>
                <head>
                <script language=""JavaScript"" type=""text/JavaScript"">
                function getUserAgent() {
                    window.external.notify(navigator.userAgent);
                }
                </script>
                </head>
                <body onload=""getUserAgent();""></body>
                </html>";

            webBrowserControl.NavigateToString(html);
        }

Finally process the ScriptNotifi event and recover the UserAgent value. The format of UserAgent looks like this (in this case the User Agent of a Windows Phone Emulator)

Mozilla/4.0 (compatible; MSIE 7.0; Windows Phone OS 7.0; Trident/3.1; IEMobile/7.0; Microsoft; XDeviceEmulator)

void webBrowserControl_ScriptNotify(object sender, NotifyEventArgs e)

    _userAgent = e.Value;  
    System.IO.IsolatedStorage.IsolatedStorageSettings.ApplicationSettings["UserAgent"] = _userAgent;

    if (UserAgentChanged != null)
    {
        UserAgentChanged(e.Value, new EventArgs());
    }
}

NOTE: If you want to recover this value later, you can do this:

string userAgent;
System.IO.IsolatedStorage.IsolatedStorageSettings.ApplicationSettings.TryGetValue<string>("UserAgent", out userAgent);

Wednesday, August 10, 2011

[Tutorial] Windows Azure Toolkit for iOS 1.1. Integrating iOS apps with Windows Azure

To write this article I've borrowed  Wade Wegner's article: Getting Started with the Windows Azure Toolkit for iOS which explains how to create an Azure - iOS project with Windows Azure Toolkit for iOS 1.0 and updated it because class names and method names has changed and could cause some confusion for those developers who wants to use this toolkit.

So here we go!

Unpacking the v1.0.0 library zip file

You can download the compiled storage library on github (found under downloads in https://github.com/microsoft-dpe/watoolkitios-lib).  When you upzip the zip file, you’ll find several folders:

•    /4.3-device – the library binary for iOS 4.3 (device)
•    /4.3-simulator – the library binary for iOS 4.3 (simulator)
•    /include – the headers for the library

Creating your first project using the toolkit

If you are not familiar with XCode, this is a short tutorial for getting your first project up and running. Launch XCode 4 and create a new project:


Select a View-based application and click Next.
Give the project a name and company. For the purposes of this walkthrough, we’ll call it “FirstAzureProject”. Do not include Unit Tests.


When the project opens, right click on the Frameworks folder and select “Add Files to…”


Locate the libwatoolkitios.a library file from the download package folder (from either the simulator or device folder), and add it to the Frameworks folder.


Now, click on the top most project (FirstAzureProject) in the left hand column.  Click on the target in the second column.  Click on the “Build Settings” header in the third column.  Ensure that the “All” button is selected to show all settings.
In the search box, type in “header search” and look for an entry called “Header Search Paths”:


Double-click on this line (towards the right of the line), and click on the “+” button in the lower left.


Add the path to where the folder containing the header files are located (this is the include folder from the download).  For example, "~/Desktop/v1.0.0/include" if you have extracted the folder on your desktop.  Be sure to encapsulate in quotes if you have spaces in the path.


Now, click on the “Build Phases” tab and expand the “Link Binary with Libraries” section:


Click on the “+” button in the lower left, and scroll down until you find a library called “libxml2.2.7.3.dylib”.  Add this library to your project. Don’t forget to add the header search path to /usr/include/libxml2

Testing Everything Works

Now that you’ve added all of the required references, let’s test that the library can be called.  To do this, double click on the [ProjectName]AppDelegate.m file (e.g. FirstAzureProjectAppDelegate.m), and add the following imports to the class:

#import "WAAuthenticationCredential.h"
#import "WACloudStorageClient.h"

Perform a build.  If the build succeeds, the library is correctly added to the project.  If it fails, it is recommended to go back and check the header search paths.

Assuming it builds, in the .m file, add the following declarations after the @synthesize lines:

WAAuthenticationCredential *credential;
WACloudStorageClient *client;

Now, add the following lines after the [self.window makeKeyAndVisible] line in the didFinishLaunchingWithOptions method:

credential = [WAAuthenticationCredential credentialWithAzureServiceAccount:@"ACCOUNT_NAME" accessKey:@"ACCOUNT_KEY"];
client = [WACloudStorageClient storageClientWithCredential:credential];
[client fetchBlobContainersWithCompletionHandler:^(NSArray* containers, NSError* error)
{
if (error)
{
NSLog(@"%@",[error localizedDescription]);
}
else
{
NSLog(@"%i containers were found…",[containers count]);
}
}];

Maybe you could be more used to work with delegates, so, in this case you have to implement in your class <WACloudStorageClientDelegate> and sets your client’s delegate property to self and invoke fetchBlobContainers.


    storage.delegate = self;
    [client fetchBlobContainers];

Once you’ve done this you have to implement two methods, first one is to handle is an error occurs or the request fails, and this method is common for any action accomplished with our WACloudStorageClient object and second one is called when the WABlobContainer list is retrieved.

- (void)storageClient:(WACloudStorageClient *)client didFailRequest:(NSURLRequest *)request withError:(NSError *)error
{
    NSLog(@"%@", [error description]);
}

- (void)storageClient:(WACloudStorageClient *)client didFetchBlobContainers:(NSArray *)containers
{
    NSLog(@"%i Blob containers found", [containers count]);   
}

Be sure to replace ACCOUNT_NAME and ACCOUNT_KEY with your Windows Azure storage account name and key, available on the Windows Azure portal

Build and run the project.  You should something similar to the following output in the debug window:

2011-05-06 18:18:46.001 FirstAzureProject[27456:207] 2 containers were found…

The last line shows that this account has 2 containers.  This will of course vary, depending on how many blob containers you have setup in your own Windows Azure account.

Doing more with the toolkit

Feel free to explore the class documentation to explore more of the toolkit API.  To help, here are some additional examples:

In [ProjectName]AppDelegate.m class, add the following headers:

#import "WAAuthenticationCredential.h"
#import "WACloudStorageClient.h"
#import "WABlobContainer.h"
#import "WABlob.h"
#import "WAAableEntity.h"
#import "WATableFetchRequest.h"
In the didFinishLaunchingWithOptions method, after the [self.window makeKeyAndVisible] line, try testing a few of the following commands.  Again, running the project will return results into the debugger window.
To authenticate using account name and key:

credential = [WAAuthenticationCredential credentialWithAzureServiceAccount:@"ACCOUNT_NAME" accessKey:@"ACCOUNT_KEY"];
To authenticate instead using the proxy service from the Windows Phone 7 toolkit, you can use the following:
credential = [WAuthenticationCredential authenticateCredentialWithProxyURL:[NSURL URLWithString:@"PROXY_URL"] user:@"USERNAME" password:@"PASSWORD" password:withCompletionHandler:^(NSError *error)
{
if (error)
{
NSLog(@"%@",[error localizedDescription]);
}
else
{
NSLog(@"Successfully logged in");
}
}];
Replace the PROXY_URL, USERNAME, and PASSWORD with the information required to access your proxy service.

Once again, if you prefer using delegates instead of handlers you must implement WAAuthenticationDelegate and chage the method invoked.

[WAAuthenticationCredential authenticateCredentialWithProxyURL:[NSURL URLWithString:proxyURL] user:usernameField.text password:passwordField.text delegate:self];

After that we have to implement  both methods -loginDidSucceed which will be invoked if the login is succeed and loginDidFailWithError: if the login isn’t.

- (void)loginDidSucceed
{
    Azure_Storage_ClientAppDelegate        *appDelegate = (Azure_Storage_ClientAppDelegate *)[[UIApplication sharedApplication] delegate];

    StorageTypeSelector *newController = [[StorageTypeSelector alloc] initWithNibName:@"StorageTypeSelector" bundle:nil];
    newController.navigationItem.title = @"Storage Type";
    [appDelegate.navigationController pushViewController:newController animated:YES];
    [newController release];
}

- (void)loginDidFailWithError:(NSError *)error
{

    UIAlertView *alertView = [[UIAlertView alloc] initWithTitle:@"Login Error" message:[NSString stringWithFormat:@"An error occurred: %@", [error localizedDescription]] delegate:nil cancelButtonTitle:@"OK" otherButtonTitles:nil];
    [alertView show];
    [alertView release];
    proxyURLField.text = @"";
    usernameField.text = @"";
    passwordField.text = @"";
}
To create a new client using the credentials:

client = [WACloudStorageClient storageClientWithCredential:credential];


To list all blob containers (this method is not supported via the proxy server):

// get all blob containers
[client fetchBlobContainersWithCompletionHandler::^(NSArray *containers, NSError *error)
{
if (error)
{
NSLog(@"%@",[error localizedDescription]);
}
else
{
NSLog(@"%i containers were found…",[containers count]);
}
}];
To get all blobs within a container (this also is not supported by the proxy):
// get all blobs within a container
[client fetchBlobs:@"images" withBlock:^(NSArray *blobs, NSError *error)
{
if (error)
{
NSLog(@"%@",[error localizedDescription]);
}
else
{
NSLog(@"%i blobs were found in the images container…",[blobs count]);
}
}];
To get all tables from storage (this works with both direct access and proxy):
// get all tables
[client fetchTablesWithCompletionHandler:^(NSArray* tables, NSError* error)
{
if (error)
{
NSLog(@"%@",[error localizedDescription]);
}
else
{
NSLog(@"%i tables found",[tables count]);
}
}];
To create a table (works with both direct access and proxy):
// create table
[client createTableNamed:@"wadestable" withBlock:^(NSError *error)
{
if (error)
{
NSLog(@"%@",[error localizedDescription]);
}
else
{
NSLog(@"Table created");
}
}];
To delete a table (works with both direct access and proxy):
//delete a table
[client deleteTableNamed:@"wadestable" withBlock:^(NSError *error)
{
if (error)
{
NSLog(@"%@",[error localizedDescription]);
}
else
{
NSLog(@"Table was deleted");
}
}];
To get entities for a table (works with both account key and proxy):

// get entities for table developers
WATableFetchRequest* fetchRequest = [WATableFetchRequest fetchRequestForTable:@"Developers"];
[client fetchEntities:fetchRequest withCompletionHandler:^(NSArray *entities, NSError *error)
{
if (error)
{
NSLog(@"%@",[error localizedDescription]);
}
else
{
NSLog(@"%i entities found in the developer table",[entities count]);
}
}];
To get entities for a table using predicate (works with both account key and proxy):
// get entities for table developers with predicate request
NSError* error = nil;
NSPredicate* predicate = [NSPredicate predicateWithFormat:@"Name = 'Wade' || Name = 'Vittorio' || Name = 'Nathan'"];
WATableFetchRequest* anotherFetchRequest = [WATableFetchRequest fetchRequestForTable:@"Developers" predicate:predicate error:&error];
[client fetchEntities:anotherFetchRequest withCompletionHandler:^(NSArray *entities, NSError *error)
{
if (error)
{
NSLog(@"%@",[error localizedDescription]);
}
else
{
NSLog(@"%i entities returned by this request",[entities count]);
}
}];

All of these actions could be accomplished using WACloudStorageDelegate methods instead of completion handlers. If you are interested in just have a look at the documentation to find which methods you should implement for which actions.

Doing even more with the toolkit

If you are looking to explore the toolkit further, I recommend looking at the sample application that can be found in the watoolkitios-samples project.  This project demonstrates all of the functionality of the toolkit, including creating, uploading, and retrieving entities from both table and blob storage.

Thursday, August 4, 2011

[Code Snippet] Dynamic height for UITableViewCell

Hi there, let's see a new code snippet this week that's very useful when we are loading dinamic text in UITableView cells and we don't know which its exactly lenght is, so we have to adapt both UILabel and UITableViewCell height.

First thing to do is calculate the UITableViewCell height inside heightForRowAtIndexPath:(NSIndexPath)indexPath. That's the first of the two methods that we have to implement for UITableViewDataSource protocol in order to calculate the total of cell height. Be careful because you have to add all cell heights for any control that are docked vertically.

Obtaining the text size of the label is quite easy, we only have to specify the label widht, the font size, line break mode and text content, and we'll obtain a CGSize variable storing the label size.
   
    CGSize labelSize = CGSizeMake(labelWidth, 20000.0f);
    CGSize textSize = [@"Lorem ipsum dolor" sizeWithFont:[UIFont systemFontOfSize: 12.0f] constrainedToSize:labelSize lineBreakMode:UILineBreakModeWordWrap];
   
    cellHeight = textSize.height + 21.0f + 30; //Adding other control heights
   
    return cellHeight;
Next, you have to implement cellForRowAtIndexPath method for dinamic resizing of the UILabel which shows our text. Using the same method described before you can set label's frame to show text completely.

    UILabel *textDescription = (UILabel*)[cell viewWithTag:3];
    textDescription.text = @"Lorem ipsum dolor...";
    CGSize labelSize = CGSizeMake(labelWidth, 20000.0f);
    CGSize textSize = [rssItem.descripcion sizeWithFont:[UIFont systemFontOfSize: 12.0f] constrainedToSize:labelSize lineBreakMode:UILineBreakModeWordWrap];
    [txtDescripcion setFrame:CGRectMake(13.0f, 45.0f,
                                          labelWidht, textSize.height)];

And that's all to dynamic resizing of UILabels and UITableViewCells for show unknow length text. I hope this had helped you

NOTE: A good practise is to have the label widht defined as a constant, in our case labelWidth.

Thursday, July 28, 2011

[Code Snippet] Add UIButton programatically

I have not so much time to update the blog, but I have to maintance the wednesday's code snippet so today's code snippet is about one of those things that are very easy to do, but difficult to remember: add a UIButton programatically to our view.

To add a basic UIButton programatically, just instance it, give it a frame and obviously a selector for the TouchInside (click) event, and that's all.

Code snippet is like that

UIButton *myButton = [UIButton buttonWithType:UIButtonTypeRoundedRect];
[myButton addTarget:self
           action:@selector(myButton_click:)
 forControlEvents:UIControlEventTouchDown];
[myButton setTitle:@"My title" forState:UIControlStateNormal];
myButton.frame = CGRectMake(80.0, 210.0, 160.0, 40.0);
[view addSubview:myButton];

- (IBAction) myButton_click:(id)sender
{
    NSLog(@"Button clicked");
}

Good programming!!!!

Wednesday, July 20, 2011

[Code Snippet] Scheduling local notifications

Sometimes we want to create an app that notifies the user some information when a selected date/time is reached, for that reason Apple included local notifications since iOS 4.1

The use of local notifications is much easier than PUSH notifications, that needs to implement a server-side web app for sending PUSH notifications through Apple Push Notification (APN) service.

To use local notifications, you only have to instantiate NSLocalNotification class, set it's fire date and time, its message, sound and any other fields that you could need and schedule it in local notification scheduler, and iOS do the rest for you.

Here is a sample code

UILocalNotification *localNotif = [[UILocalNotification alloc] init];

if (localNotif == nil)
     
return;

localNotif.fireDate = itemDate;
localNotif.timeZone = [NSTimeZone defaultTimeZone];

// Set the action button
localNotif.alertAction = @”View”
//This sets the alert text to the current text in the textfield.

localNotif.alertBody = @"Charle's birthday";

//This sets the sound name of the notification.
localNotif.soundName = UILocalNotificationDefaultSoundName;

//You can also set the badge number of the application.
localNotif.applicationIconBadgeNumber = 1;

// Schedule the notification
[[UIApplication sharedApplication] scheduleLocalNotification:localNotif];

[localNotif release];

I hope this could be useful for you, enjoy it!!

[e-book] Mobile Developer's Guide 8th edition (Free)

A few weeks ago, I've downloaded two free ebooks in PDF Format about mobile development, and last week I had time to have a look at these.

First one is Mobile Developer's Guide 8th edition, that you can download here. It's a very useful guide for these people who wants to start in mobile development, but they're a bit lost. This guide provides a little approach for each mobile platform (introductio, pre-requisites, development, testing, publication) and talks about cross-platform frameworks or mobile web apps too.

As well as being a highly recommended reading for begginers, if you are a senior mobile developer, maybe you only know one, two or three platforms, but no more. With this reading you could know advantages and disadvantages for every platforms and development strategies and you can take a decission, and what is more important: Justify it to your customer/boss/...

At last, this book has a hardcopy version which, if you purchase it, you will be helping Africa through AppsWorld Africa.

So if you have any free time, download or purchase it and read it.

P.S. Thanks to @davidcontrerasm for talking me about this book via Twitter.

Wednesday, July 13, 2011

[Code Snippet] Store a NSArray of custom objects into NSUserDefaults

We're  back from holidays, it has been two weeks without updates, so now it's time for doing it.

Sometimes we have to cache some kind of information, or store it easily because we don't need to make searches on them, just we want to recover ir quickly. In this case using SQLite for local storage is a big solution for a little problem, and store the information as a XML based file lead us to write a serializer and a custom XMLParser, so the best option to accomplish that is store it in NSUserDefaults.

Maybe you have already stored basic information like NSString or NSNumber objects in user defaults, so you know that it is an easy way to store a NSObject into a NSDictionary.

But maybe you want to store a little array of information, for example a little shop list with identification number, and description, so you have created a object like this.

@interface ShopItem : NSObject
{
        int numberID;
        NSString *description;
}

@property (nonatomic, assign) int numberID;
@property (nonatomic, retain) NSString *description;

@end

So, how could we store a NSArray containing some of this objects into NSUserDefaults? Store the NSArray object into NSUserDefaults as usually cause our app to crash, so we have to serialize and deserialize the NSArray of custom objects implementing NSCoding protocol in our custom NSObject to encode key-value pairs for each property of our custom object.

@interface ShopItem : NSObject <NSCoding>
{
        int numberID;
        NSString *description;
}

@property (nonatomic, assign) int numberID;
@property (nonatomic, retain) NSString *description;

@end
@implementation ShopItem

@synthesize number, description, shoppingDate;

- (void)encodeWithCoder:(NSCoder *)coder;
{
    [coder encodeObject:description forKey:@"description"];
    [coder encodeInteger:numberID forKey:@"numberID"];
}

- (id)initWithCoder:(NSCoder *)coder;
{
    self = [[ShopItem alloc] init];
    if (self != nil)
    {
        description = [coder decodeObjectForKey:@"description"];
        numberID = [coder decodeIntegerForKey:@"numberID"];
    }  
    return self;
}

@end

Once we have implemented NSCoding protocol in the custom object, we are able to store our NSArray in NSUserDefaults like that

[[NSUserDefaults standardUserDefaults] setObject:[NSKeyedArchiver archivedDataWithRootObject:objectArray] forKey:@"savedArray"];

To retrieve our NSArray again, we should recover the NSArrayObject from NSUserDefaults, check that it's not nil (be careful, if you try to decode a nil array, you'll get an EXC_BAD_ACCESS exception) and unarchive it.

NSUserDefaults *currentDefaults = [NSUserDefaults standardUserDefaults];
NSData *dataRepresentingSavedArray = [currentDefaults objectForKey:@"savedArray"];
if (dataRepresentingSavedArray != nil)
{
        NSArray *oldSavedArray = [NSKeyedUnarchiver unarchiveObjectWithData:dataRepresentingSavedArray];
        if (oldSavedArray != nil)
                objectArray = [[NSMutableArray alloc] initWithArray:oldSavedArray];
        else
                objectArray = [[NSMutableArray alloc] init];
}

With this pieces of code, you could store and retrieve little sets of information in your NSUserDefaults local storage.

I hope this helps you.

Wednesday, June 22, 2011

[Code Snippet] Playing video streaming in our iPhone App

Hi there. Today's code snippet is another easy one, just for playing video streaming embedded in our app using Media Player Framework.

First thing to do is to import the headers that we need

#import <MediaPlayer/MediaPlayer.h>

After that we'll have to instantiate the MPMoviePlayerController and add it as a subview to our actual view. We could set the MPMoviePlayer controller frame, to get a full screen player or not.


MPMoviePlayerController *player = [[MPMoviePlayerController alloc] initWithContentURL:
                                            [NSURL URLWithString:@"http://devimages.apple.com/iphone/samples/bipbop/bipbopall.m3u8"]];
   
    [player.view setFrame: self.view.bounds];  // player's frame must match parent's
    [self.view addSubview: player.view];
   
    [player prepareToPlay];
    [player play];

Two things to take care:

First one: Take care about the supported stream formats for iOS, if the video streaming is not played maybe because the streaming is not transmitted in the correct formats. Review the stream formats and the best practices for iOS streaming here

Second one: Video player is another control yet, so you can add controls onto it like UILabels, UIButtons and make your streaming a bit interactive for the user. Just add the control with addView method and you can use it.

I hope this code snippet could be useful for you. Now I'm inmersed into interoperability between Microsoft Azure cloud computing framework and iPhone so it's possible that in a few weeks there are some articles about that.

Wednesday, June 15, 2011

[Code Snippet] Implementing UIActionSheets

This week code snippet is about how to implement UIActionSheet in our UIViewController to present actions like a context menu. Like my previous post, this is so easy but have it previously implemented could save us some valious time.

To show the UIActionSheet, instance UIActionSheet and show it with this piece of code.

UIActionSheet *popupQuery = [[UIActionSheet alloc] initWithTitle:@"Share" delegate:self cancelButtonTitle:@"Cancelar" destructiveButtonTitle:nil otherButtonTitles:@"Facebook", @"Twiter", @"E-mail", nil];
        popupQuery.actionSheetStyle = UIActionSheetStyleBlackOpaque;
   
    [popupQuery showInView:self.view];
    [popupQuery release];

Cancel button will hide our action sheet when is pushed, destructive button will appear in red background and any other button will appears as normal. Both, destructive and the other buttons behaviour has to be declared implementing UIActionSheetDelegate clickedButtonAtIndex.


-(void)actionSheet:(UIActionSheet *)actionSheet clickedButtonAtIndex:(NSInteger)buttonIndex {
     if (buttonIndex == 0) {
       
         NSLog(@"Button Facebook clicked");

    } else if (buttonIndex == 1) {
       
        NSLog(@"Button Twitter clicked");;

    } else if (buttonIndex == 2) {

        NSLog(@"Button Email clicked");
       
    }
}

With this piece of code you can implement a context menu like behaviour in your view. Take note that you have not to implement cancel button index click behaviour.


I hope this code snippet helps you, enjoy it!!!

Wednesday, June 8, 2011

[Code Snippet] Sending emails from our app with MessageUI framework

Hello everybody, I've been very busy last days, too much work, so this week I'll bring you an easy code snippet that everybody should know but could be useful to have it here for cut & past simply.

When we want to use the iOS' email composer from our app, first thing to do is to link MessageUI framework with our binaries, and obviously import it in our header file.

#import <MessageUI/MessageUI.h>

For using it, you have to implement in your class the MFMailComposeViewControllerDelegate

@interface MyViewController : UIViewController <MFMailComposeViewControllerDelegate>

After that, to invoke the MFMailComposer is so easy, just instance it and preload all the email fields that you want: To, cc, bcc, subject... and present it as a modal view controller. Don't forget setting the mailComposeDelegate property to the class which implements MFMailComposeViewControllerDelegate, usually the same class that invokes MFMailComposeViewController.:

    MFMailComposeViewController *mailView = [[MFMailComposeViewController alloc] init];
    mailView.mailComposeDelegate = self;
    mailView.navigationBar.tintColor = [UIColor colorWithRed:0.36078431 green:.015686275 blue:.0078431373 alpha:1];
    [mailView setToRecipients:[NSArray arrayWithObject:@"fiveflamesmobile.blogspot.com"]];
   
    [self presentModalViewController:mailView animated:YES];
   
    [mailView release];

After those steps we have to implement de MFMailComposrDelegateProtocol as this:

#pragma mark -
#pragma mark MFMailComposeViewControllerDelegate

- (void) mailComposeController:(MFMailComposeViewController *)controller didFinishWithResult:(MFMailComposeResult)result error:(NSError *)error
{
    [self dismissModalViewControllerAnimated:YES];
   
    UIAlertView *alert = nil;
   
    if (result == MFMailComposeResultSent)
    {
        alert = [[[UIAlertView alloc] initWithTitle:NSLocalizedString(@"EmailEnviado", "") message:NSLocalizedString(@"EmailExito", "") delegate:self cancelButtonTitle:NSLocalizedString(@"Aceptar", "") otherButtonTitles:nil] autorelease];
       
    } else if (result == MFMailComposeResultSaved) {
       
        alert = [[[UIAlertView alloc] initWithTitle:NSLocalizedString(@"EmailGuardado", "") message:NSLocalizedString(@"EmailBorradores", "") delegate:self cancelButtonTitle:NSLocalizedString(@"Aceptar", "") otherButtonTitles:nil] autorelease];
       
    } else if (result == MFMailComposeResultFailed) {
       
        alert = [[[UIAlertView alloc] initWithTitle:NSLocalizedString(@"EmailNoEnviado", "") message:NSLocalizedString(@"EmailFallo", "") delegate:self cancelButtonTitle:NSLocalizedString(@"Aceptar", "") otherButtonTitles:nil] autorelease];
    }
   
    [alert show];
}

Be careful, I've user localizated string to show the message in the alert view, but maybe I'll write about that in next code snippets. And with this few lines of code you will be able to send emails with the iOS mail client.

So that's all for today. More and better (I'll try it) the next week.

Wednesday, June 1, 2011

[Code Snippet] When keyboard shows...

Sometimes we have a lot of UITextField controls in our UIView, but what happends when the keyboard is shown??? The UITextFields that are at the bottom of the UIView are hidden behind the keyboard and users don't know what they're writing.

Today's code snipett tries to help the developer to avoid this issue. What we shall do is to move the UIView up when keyboard shows and move it down again when keyboards hides. To accomplish that we have tu use observers,  and implement the two methods that will be called when keyboards shows and hides.

First, we have to add the observers to NSNotificationCenter default center for the events of showing and hiding the keyboard Implements this in viewDidLoad method.

    [[NSNotificationCenter defaultCenter] addObserver:self selector:@selector(keyboardWillShow:) name:UIKeyboardWillShowNotification object:nil];
    [[NSNotificationCenter defaultCenter] addObserver:self selector:@selector(keyboardWillHide:) name:UIKeyboardWillHideNotification object:nil];
 After that we implement both methods. We have to calculate the height at our hidden UITextField is, for adding or substract it from view's frame origin in order to move the UIView up and down. If we have more than one UITextField controls we shall to detect which is the first responder and sets the position accord to it.

- (void) keyboardWillShow: (NSNotification*) aNotification;
{   
    int position = 0;
   
   
    if ([textField1 isFirstResponder])
        position = 100;
    else if ([textField2 isFirstResponder])
        position = 150;
           
    [UIView beginAnimations:nil context:NULL];
    [UIView setAnimationDuration:0.3];
    CGRect rect = [[self view] frame];
    rect.origin.y -= position;
    [[self view] setFrame: rect];
    [UIView commitAnimations];
   
}

- (void) keyboardWillHide: (NSNotification*) aNotification;
{
    int position = 0;
   
   
    if ([textField1 isFirstResponder])
        position = 100;
    else if ([textField2 isFirstResponder])
        position = 150;
   
    [UIView beginAnimations:nil context:NULL];
    [UIView setAnimationDuration:0.3];
    CGRect rect = [[self view] frame];
    rect.origin.y += position;
    [[self view] setFrame: rect];
    [UIView commitAnimations];
}

And with this code snippet you will have a professional application that provides a good user experience and an animated interface when editing.

Enjoy it!

Sunday, May 29, 2011

What it seems to be, but it wasn't

Some time ago, I read somewhere that Microsoft will help iOS developers to migrate their apps/games to Microsfot Windows Phone market, and for that objective Microsoft launches iOS to WP7 API Mapping Tool. I was surprised, I thought Microsoft released a tool that save us a lot of time translating our classes from Objective-C, and maybe also xib files will be translated to XAML files with only a mouse click. So a few days ago I decided to download this tool to migrate some of my apps (Tickeating and Valladolid Wifi) to WP7 in a few time but... Oh wait! There was not a "magical tool" that transalate all the code for me...

So, did Microsoft lie us??? I don't think that at all, I want to think that there was a confusion with the name, and the word "tool" will not be there. But wait a moment, Microsoft had the detail for iOS developer to map the libraries from one framework to another. There isn't a "magical tool" that saves us a lot of time, but there is a good tool that saves us some time, be positive my friends.

With this aptitude I think that Microsoft wants to attract iOS apps and game developers to migrate its applications to Windows Phone. Develop for Windows Phone with Visual Studio 2010 its easy for people who develops for iOS so its a great idea release this kind of tools, in an attemp to gain Android apps market share and obviously sell more devices.

This is the URL of iOS to WP7 API Mapping Tool: http://wp7mapping.interoperabilitybridges.com/

[iPhone-app] Valladolid WiFi

Valladolid WiFi is a smart utility application which helps the user to look for public WiFi access points located in Valladolid. From tourist to Valladolid citizens they could use the applications for find a public wifi in a pub, hotel or university and get connected.

At the moment there is only Valladolid WiFi at app store, but we are looking for people who wants to bring this application to their city all over the world. We only need that people send us the name, address and location of their business whith public WiFi and we'll put it into the application database (we need a minimum of 15 WiFi point to launch a city personalized app) and it's for FREE.

If you are interested, please contact me: fiveflamesmobile@gmail.com

Name: Valladolid WiFi
Language: Spanish
Category: Utilities
Cost: Free

Valladolid WiFi AppStore Link

Wednesday, May 25, 2011

[Code Snippet] Custom UINavigationItem title

Last week I was working in an iPhone navigation based project, the customer wanted to have its own corporative colors in the application, and for the UINavigationBar too.

There was no problem with whole color for buttons and bar, using the UINavigationBar tintColor proprerty I set the desired color, but when the UINavigationItem title time becomes it was more difficult. We have to forget the UINavigationItem title proprerty and work with titleView one. This proprerty can be fulfilled with any UIView object, in my case I used a UILabel, but I have to set a different titleView for my different UIViewControllers so I encapsulated this in the function that I make available for you.

+ (UILabel*) labelForNavigationItem:(NSString*)text
{
   
   
    UILabel *titleView = [[[UILabel alloc] initWithFrame:CGRectMake(0, 0, 120, 30)] autorelease];
    [titleView setFont:[UIFont boldSystemFontOfSize:16.0]];
    titleView.backgroundColor = [UIColor clearColor];
    titleView.textAlignment = UITextAlignmentCenter;
    titleView.textColor  = [UIColor colorWithRed:.80784314 green:.77647079 blue:.50980392 alpha:1.0];
    titleView.textColor = [UIColor whiteColor];
    titleView.text = text;
   
    return titleView;
}
And assign the corresponding proprerty on viewDidLoad function

self.navigationItem.titleView = labelForNavigationItem:@"Menu";
That's all.

But at last I found a problem that I wasn't able to accomplish. I want to keep the standard UINavigationController backButton, but how could I change its font color? I think its no possible (at least without using an image), but if someone has any answer I would be grateful.

Enjoy it!

Wednesday, May 18, 2011

[Code Snippet] Hex Color (HTML) to "iOS RGB"

Most of the available applications at mobile markets are games or marketing apps, so our customers wants a very visual interface, an interface which attract the potential users or only embed the corporation logo and colours into the app's look & feel.

But most of developers have one handicap: We don't know about graphic design, color combination and logo designs, although some customer don't take care about that, so we have to work with a designer which makes all that graphic work. In most cases the designer give us the colors in RGB mode (0-255), so we have to convert them to "Mac RGB" (0 to 1) dividing each value between 255. But, what happends when the designer give us the colors on hexadecimal (HTML) coding?.

Today's code snippet tries to solve that with this little function that you can use to convert from hexadecimal to "MAC RGB" whith only a call.


+ (UIColor *) colorWithHexString: (NSString *) stringToConvert
{
NSString *cString = [[stringToConvert stringByTrimmingCharactersInSet:[NSCharacterSet whitespaceAndNewlineCharacterSet]] uppercaseString];

// String should be 6 or 8 characters
if ([cString length] < 6) return DEFAULT_VOID_COLOR; // strip 0X if it appears if ([cString hasPrefix:@"0X"]) cString = [cString substringFromIndex:2]; if ([cString length] != 6) return DEFAULT_VOID_COLOR; // Separate into r, g, b substrings NSRange range; range.location = 0; range.length = 2; NSString *rString = [cString substringWithRange:range]; range.location = 2; NSString *gString = [cString substringWithRange:range]; range.location = 4; NSString *bString = [cString substringWithRange:range]; // Scan values unsigned int r, g, b; [[NSScanner scannerWithString:rString] scanHexInt:&r]; [[NSScanner scannerWithString:gString] scanHexInt:&g]; [[NSScanner scannerWithString:bString] scanHexInt:&b]; return [UIColor colorWithRed:((float) r / 255.0f) green:((float) g / 255.0f) blue:((float) b / 255.0f) alpha:1.0f]; }


I stole this piece of code from this Ars Tecnica's article where you could find more about UIColor conversions in.

Enjoy it!

Monday, May 16, 2011

Follow us in Twitter.

Five Flames Mobile has its own profile in Twitter network. Follow us! (if you want)

Seguir a FiveFlames en Twitter

Sunday, May 15, 2011

[WindowsPhone-Game] Race

Continuing with the retro games serie for Windows Phone, this game tries to recreate that old arcade machine in which you are a driver who has to avoid those kamikaze cars that comes against you (or maybe we are the kamikaze) moving to the left or to the right, and pick up the girl that appears near the road's border.
Developed with XNA Framework for Windows Phone 7 this game is only available at Microsoft Marketplace, and maybe will be available soon for iPhone at appStore.

Name: Race
Language: N/A
Category: Game
Cost: 0,99$ / 0,79 €

Wednesday, May 11, 2011

[Code Snippet] UIActivitiyIndicator at right bar button place.

Let's continue with the weekly code snippet series. Sometimes we have an UITableViewController inside a UINavigationController that we want to update performing the data query in background and notify the user that this update is going on with a UIActivityIndicator control.

The better place to place the UIActivity indicator is on navigation bar, so the activity indicator don't appears in the middle of the screen bothering the user in is normal interaction with the application.

To accomplish this, here you are a little code snipe for placing an little UIActivityIndicator at top right corner of the screen instead of a UIBarButton.

// Create a 'right hand button' that is a activity Indicator
CGRect frame = CGRectMake(0.0, 0.0, 25.0, 25.0);
self.activityIndicator = [[UIActivityIndicatorView alloc]
            initWithFrame:frame];
[self.activityIndicator sizeToFit];
self.activityIndicator.autoresizingMask =
    (UIViewAutoresizingFlexibleLeftMargin |
    UIViewAutoresizingFlexibleRightMargin |
    UIViewAutoresizingFlexibleTopMargin |
    UIViewAutoresizingFlexibleBottomMargin);

UIBarButtonItem *loadingView = [[UIBarButtonItem alloc]
         initWithCustomView:self.activityIndicator];
loadingView.target = self;
self.navigationItem.rightBarButtonItem = loadingView;

I've found that code snippet in Even Davey's Blog

Enjoy it!

Wednesday, May 4, 2011

[Code Snippet] UITableViewCell background color

Let's go with the code snippet for this week. Recently I had to load some data in a UITableView controller and mark some cells with a different background color depending of its priority, so I tried to set the background color programatically in the cellForRowAtIndexPath method but nothing happends.

So looking for the internet I found this little code snippet that allows us to change UITableViewCell background color programatically.

UIView *bg = [[UIView alloc] initWithFrame:cell.frame];
bg.backgroundColor = [UIColor greenColor]; // or any color
cell.backgroundView = bg;
[bg release];

Enjoy it!

[iPhone-app] CarCharge

CarCharge is an iPhone application that allows the user to localize the nearest electric vehicle (EV) charge point at Spain.
It allows user for searching in a distance from users location an shows all available charge points and the distance to them.
With a very visual and intuitive interface it will be a neccesary application for every EV owner who has an iPhone device.

Name: Carcharge
Language: N/A
Category: Lifestyle
Cost: FREE

CarCharg AppStore Link

Friday, April 22, 2011

[iPhone-app] Vinos de Cigales (Wines From Cigales)

Wines from Cigales is a lite application to announce throught iPhone devices D.O. Cigales (Valladolid, Spain) wineries and its associated brands. With a very simple, intuitive and visual interfaces users can view wineries contact info and the list of associated brands, search by brand, by winery or by city.

Wines from Cigales publishing at iTunes were collected by local newspapers in theirs paper and on-line editions.

Name: Vinos de Cigales / Wines from Cigales / Vins Cigales
Languages: Spanish / English / French
Category: Lifestyle.
Cost: FREE

Wines from Cigales AppStore Link

Tuesday, April 19, 2011

[Code Snippet] Custom section header in UITableView

The code snippet for this week is about customizing UITableView headers for section because most times we want to set our own font type, font size or color. To accomplish that, first thing that we should do is to implement

(UIView *) tableView:(UITableView *)tableView viewForHeaderInSection:(NSInteger)section

in our UITableViewController class. After that, this is the code snippet to customize our header with a UILabel control.

    UIView* customView = [[UIView alloc] initWithFrame:CGRectMake(10.0, 0.0, 300.0, 44.0)];
   
    // create the button object
    UILabel * headerLabel = [[UILabel alloc] initWithFrame:CGRectZero];
    headerLabel.backgroundColor = [UIColor clearColor];
    headerLabel.opaque = NO;
    headerLabel.textColor = [UIColor redColor];
    headerLabel.highlightedTextColor = [UIColor whiteColor];
    headerLabel.font = [UIFont boldSystemFontOfSize:20];
    headerLabel.frame = CGRectMake(10.0, 0.0, 300.0, 44.0);

    // If you want to align the header text as centered
    // headerLabel.frame = CGRectMake(150.0, 0.0, 300.0, 44.0);

    headerLabel.text = (NSString*)[arrayOfHeaders objectAtIndex:section];
    [customView addSubview:headerLabel];

    return customView

Have a look that returns class is UIView and iOS controls inherits for that class so we could customize section's headers with other controls like UIImageView or UIButton.

Enjoy it!

Wednesday, April 13, 2011

[WindowsPhone-Game] Oil Station

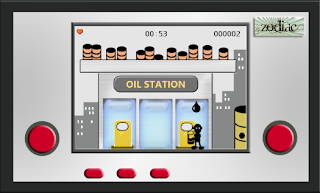
Do you remember pre-mobiles era? Do you remember that little retro arcade machines, with two buttons for left and right moves, select game mode and start? That was grandpa's modern mobile games and consoles, and why not use it in a modern device like Windows Phone?
This game is a replica of oldest one in which you are an gas station worker who has to keep the floor clean of oil. Pick up oil drops and carry them to the barrel to avoid spill them.

Available for free at Zune for Windows Phone, we expect you enjoy a great time remembering youngest time.

Name: OilStation
Language: N/A
Category: Games
Cost: FREE